推荐内容
python+pycharm+anaconda的安装
【python编程环境安装】全网最详细python环境安装。pycharm和anaconda手把手安装教学。_哔哩哔哩_bilibili
python:Download Python | Python.org
pycharm: PyCharm: the Python IDE for Professional Developers by JetBrains
anaconda: Anaconda | The World’s Most Popular Data Science Platform
如果觉得下载的太慢了
可以去这个网站找软件包:软件下载 | 我爱分享网 (zhanshaoyi.com)
(注意:解压密码:rjzkgzh)
python的基础教程
【尚学堂.百战程序员】高淇 Python 400集 (完结) #新版_哔哩哔哩_bilibili
(注意:看完前100集就可以了)
爬虫教学
爬虫是什么
网络爬虫也叫做网络机器人,可以代替人们自动地在互联网中进行数据信息的采集与整理。在大数据时代,信息的采集是一项重要的工作,如果单纯靠人力进行信息采集,不仅低效繁琐,搜集的成本也会提高。
此时,我们可以使用网络爬虫对数据信息进行自动采集,比如应用于搜索引擎中对站点进行爬取收录,应用于数据分析与挖掘中对数据进行采集,应用于金融分析中对金融数据进行采集,除此之外,还可以将网络爬虫应用于舆情监测与分析、目标客户数据的收集等各个领域。
——知乎
爬虫的基本流程
1
2
3
4
5
6
7
8
|
python >> 3.7.8
pycharm >> 2021.3
lxml == 4.6.2
requests == 2.26.0
pandas == 1.3.4
|
镜像源
豆瓣源: http://pypi.douban.com/simple/
清华源: https://pypi.tuna.tsinghua.edu.cn/simple
发起请求
通过Url向服务器发起request请求,请求可以包含额外的header信息。
1
2
3
4
5
6
7
| import requests
url = 'http://tianqihoubao.com/'
header = {
'user-agent': 'Mozilla/5.0 (Windows NT 10.0; Win64; x64) AppleWebKit/537.36 (KHTML, like Gecko) Chrome/96.0.4664.55 Safari/537.36 Edg/96.0.1054.43'
}
response = requests.get(url, headers=header)
|
URL是什么:URL是web页的地址
header是什么:headers是解决requests请求反爬的方法之一,相当于我们进去这个网页的服务器本身,假装自己本身在爬取数据。对反爬虫网页,可以设置一些headers信息,模拟成浏览器取访问网站 。常用的header信息就是user-agent和host。
怎么获取user-agent:
在所要爬取的网页中,
右键点击 >> 点击网络 >> 刷新网页 >> 随机选中一条信息 >> 查看标头 >> 下拉选择user-agent信息。
获取响应内容
如果服务器正常响应,那我们将会收到一个response,response即为我们所请求的网页内容,或许包含HTML,Json字符串或者二进制的数据(视频、图片)等。
输出结果:
Response的类型:
1
2
3
4
5
6
7
8
9
10
11
12
13
14
15
16
17
18
19
20
21
22
23
24
25
26
27
28
29
30
31
| '''
以下表示一类,并非一种。
1xx:信息性状态码
100: 继续(请求者应该继续提出请求。服务器已收到请求的一部分,正在等待其余部分)
101: 切换协议(请求者已要求服务器切换协议,服务器已确认并准备切换)
2xx:成功状态码
200: 成功(服务器已成功处理了请求)
201: 已创建(请求成功并且服务器创建了新的资源)
202: 已接受(服务器已接受请求,但尚未处理)
...
3xx:重定向状态码
300: 多种选择(针对请求,服务器可执行多种操作)
301: 永久移动(请求的网页已永久移动到新位置,即永久重定向)
302: 临时移动(请求的网页暂时跳转到其他页面,即暂时重定向)
...
4xx:客户端错误状态码
400: 错误请求(服务器无法解析该请求)
401: 未授权(请求没有进行身份验证或者验证未通过)
403: 禁止访问(服务器拒绝此请求)
...
5xx:服务器错误状态码
500: 内部服务器错误(服务器遇到错误,无法完成请求)
501: 未实现(服务器不具备完成请求的功能)
502: 错误网关(服务器作为网关或代理,从上游服务器收到无效响应)
...
'''
|
解析内容
在这里有人可能会使用正则表达式来提取内容,但是正则表达式会有不好的地方,正则表达式不容易写对,并且提取内容繁琐。(不过需要了解正则表达式的用法)
如果是HTML代码,则可以使用网页解析器进行解析;
1
2
3
| from lxml import html
from lxml import etree
|
xpath的常用规则
| 表达式 |
描述 |
| nodename |
选取此节点的所有子节点 |
| / |
从当前节点选取直接子节点 |
| // |
从当前节点选取子孙节点 |
| . |
选取当前节点 |
| … |
选取当前节点的父节点 |
| @ |
选取属性 |
一个基本网页
1
2
3
4
5
6
7
8
9
10
11
12
13
14
15
16
17
18
19
20
21
22
23
24
25
26
27
28
29
30
31
32
| <!DOCTYPE html>
<html lang="en">
<head>
<meta charset="UTF-8">
<title>html演示</title>
</head>
<body>
<div class="so_0">
<ul>
<li class="item_0">这是第一个li</li>
<li class="item_1">这是第二个li</li>
</ul>
</div>
<div id="id_from_0" class="so_2">
<ul>
<a href="http://www.baidu.com/">百度搜索</a>
<a href="https://www.google.com.hk/">Google搜索</a>
<a href="https://cn.bing.com/?mkt=zh-CN">Bing搜索</a>
</ul>
<ul>
<a href="https://xueshu.baidu.com/">百度学术</a>
</ul>
<ul>
<a href="https://fanyi.baidu.com/">百度翻译</a>
</ul>
</div>
</body>
</html>
|
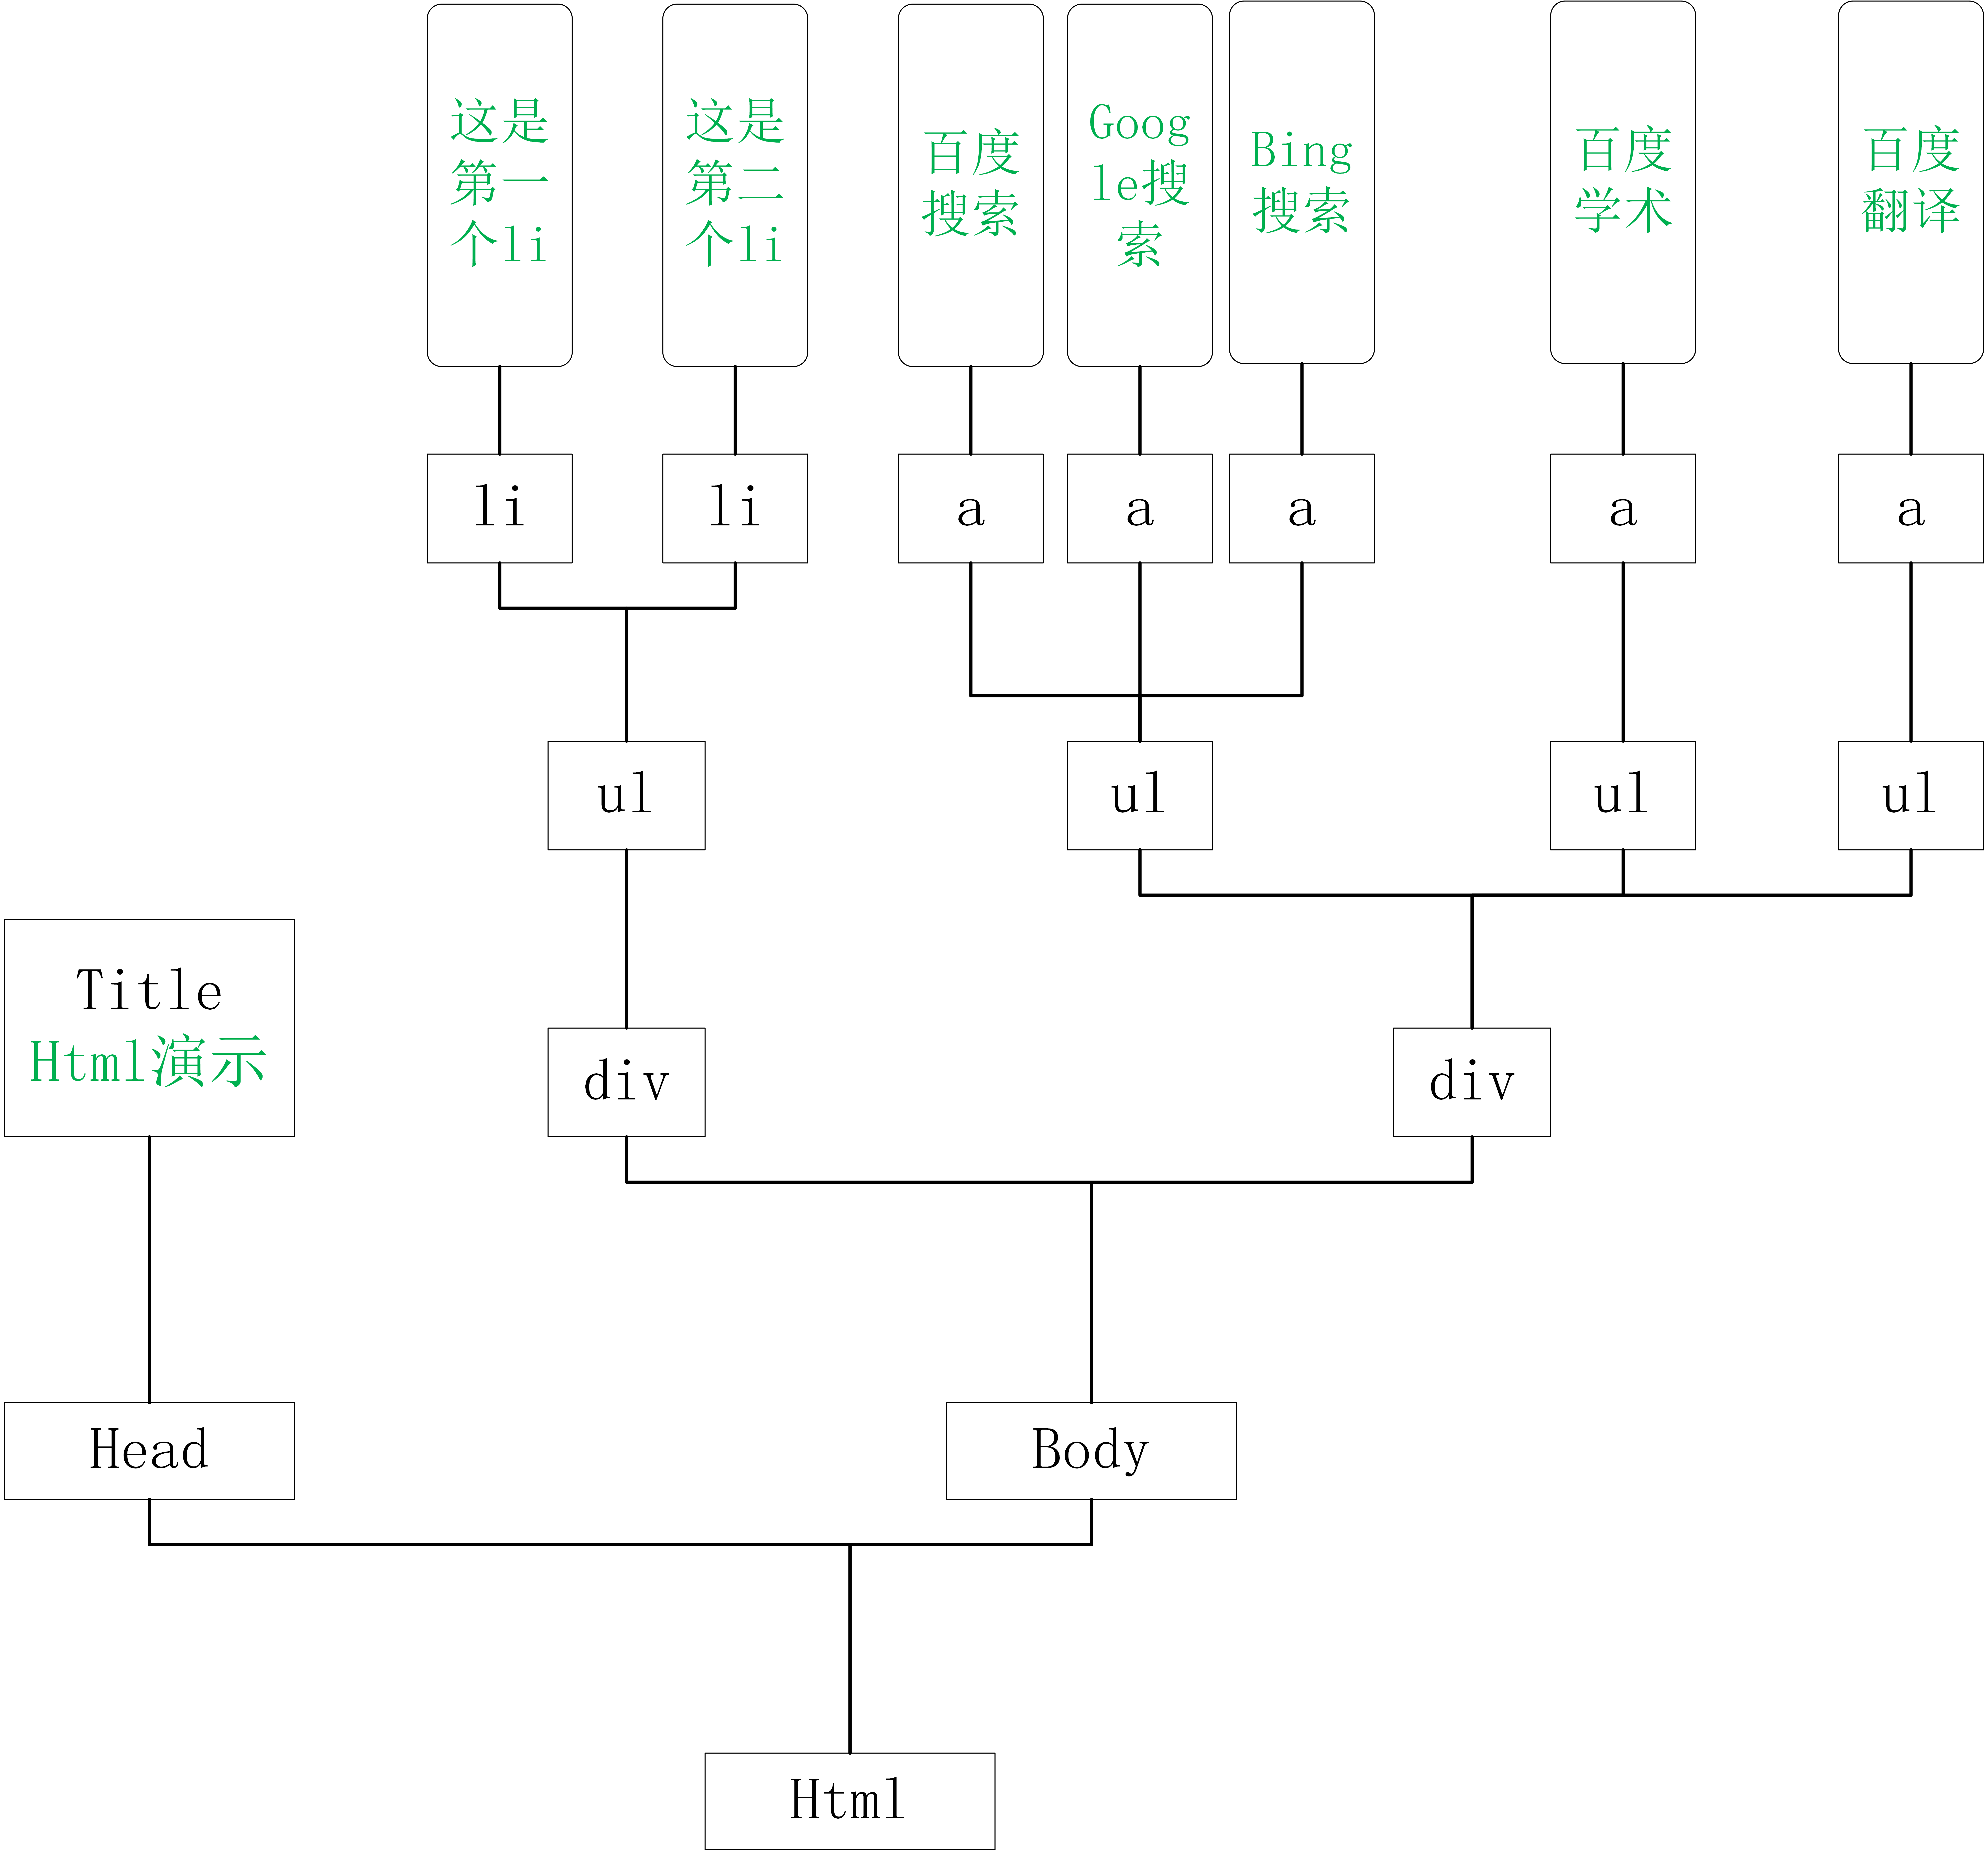
网页源代码是一个树的分布,每一个标签都是一个树杈。

如何使用xpath定位标签
1
2
3
4
5
6
7
8
9
10
11
12
13
14
15
16
17
18
19
20
21
22
23
24
25
26
27
28
29
| 定位到:标题
方法一(全路径)
title = html/head/title/text()
方法二(相对路径)
title = //title/text()
定位到:“这是第一个li”
方法一(全路径)
li_first = html/body/div[1]/ul/li[1]/text()
方法二(相对路径)
li_fisrt = //div[@class="so_0"]/ul/li[1]/text()
定位到:搜索引擎
方法一(全路径)
search_engine = html/body/div[2]/ul[1]/a/text()
方法二(相对路径)
search_engine = //div[@class="so_2"]/ul[1]/a/text()
或者
search_engine = //div[@id="id_from_0"]/ul[1]/a/text()
定位到:搜索引擎的网址
方法一(全路径)
search_engine_url = html/body/div[1]/ul[1]/a/@href
方法二(相对路径)
search_engine_url = //div[@class="so_2"]/ul[1]/a/@href
或者
search_engine_url = //div[@id="id_from_0"]/ul[1]/a/@href
|
复习xpath的常用规则
| 表达式 |
描述 |
| nodename |
选取此节点的所有子节点 |
| / |
从当前节点选取直接子节点 |
| // |
从当前节点选取子孙节点 |
| . |
选取当前节点 |
| … |
选取当前节点的父节点 |
| @ |
选取属性 |
lxml代码写法
1
2
3
4
5
6
7
8
9
10
11
12
13
14
15
16
17
18
19
20
|
content = html.etree.HTML(html_text)
html_pri = html.etree.tostring(content, encoding='utf-8').decode('utf-8')
head_title = content.xpath('//title/text()')
li_first = content.xpath('//div[@class="so_0"]/ul/li[1]/text()')
search_engine = content.xpath('//div[@id="id_from_0"]/ul[1]/a/text()')
search_engine_url = content.xpath('//div[@id="id_from_0"]/ul[1]/a/@href')
|
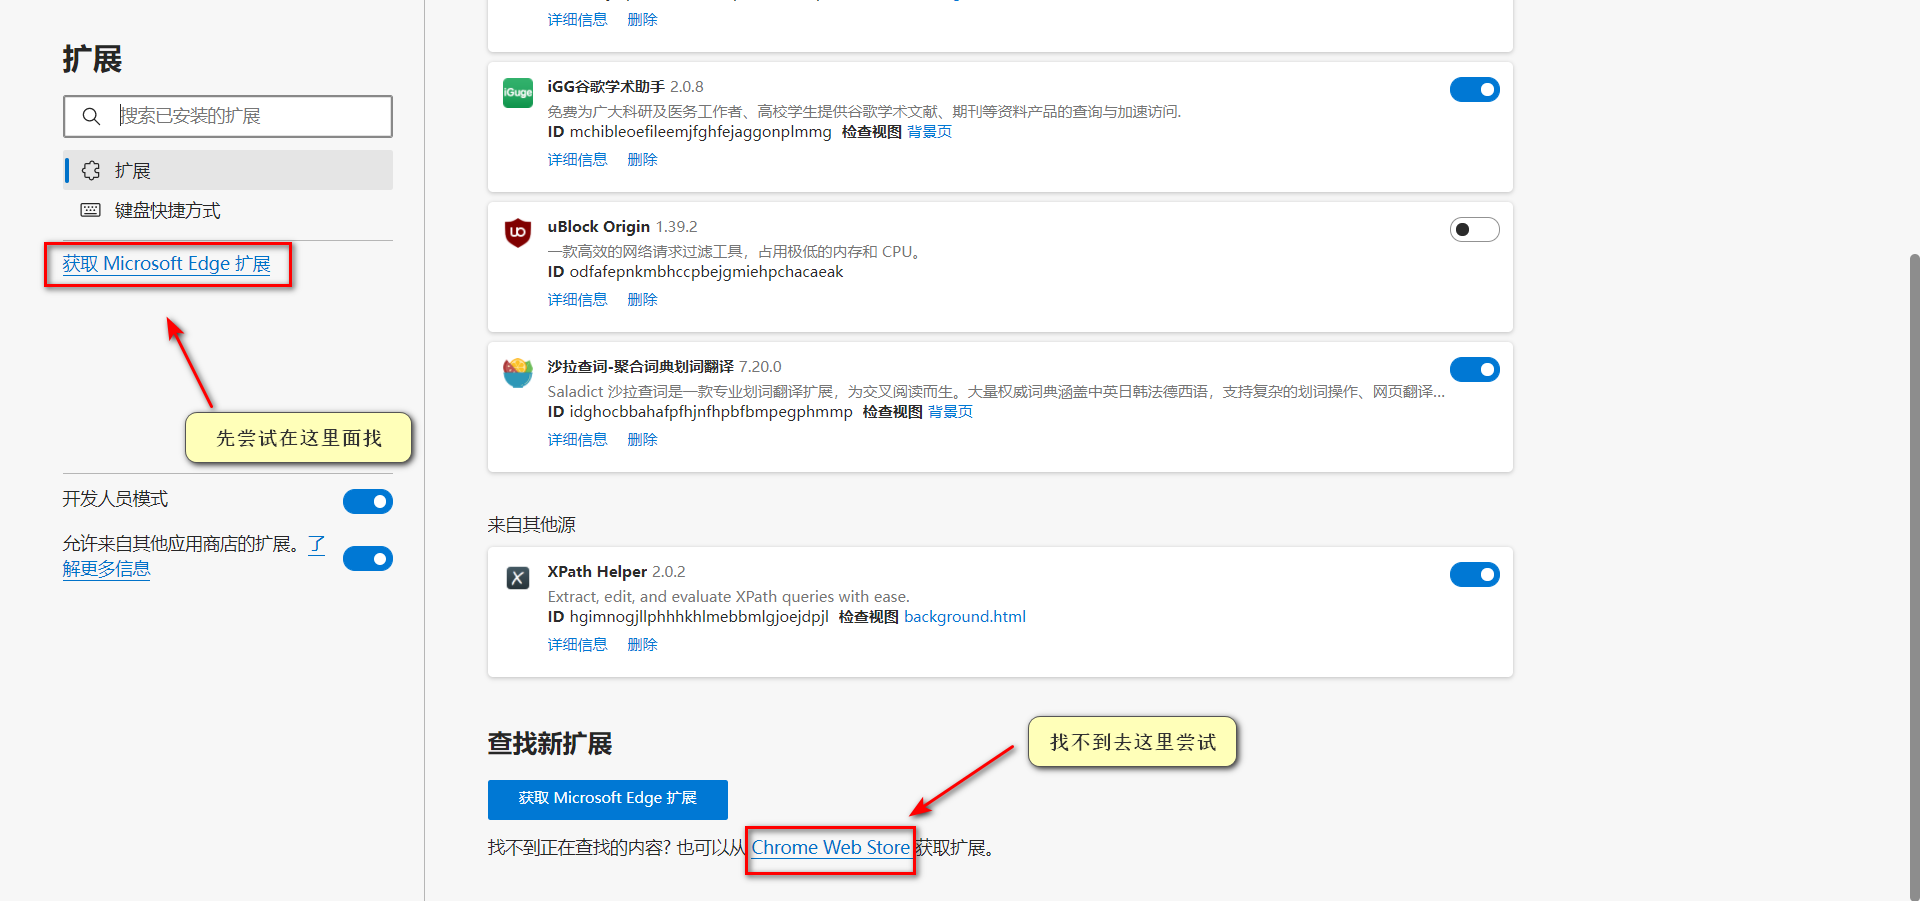
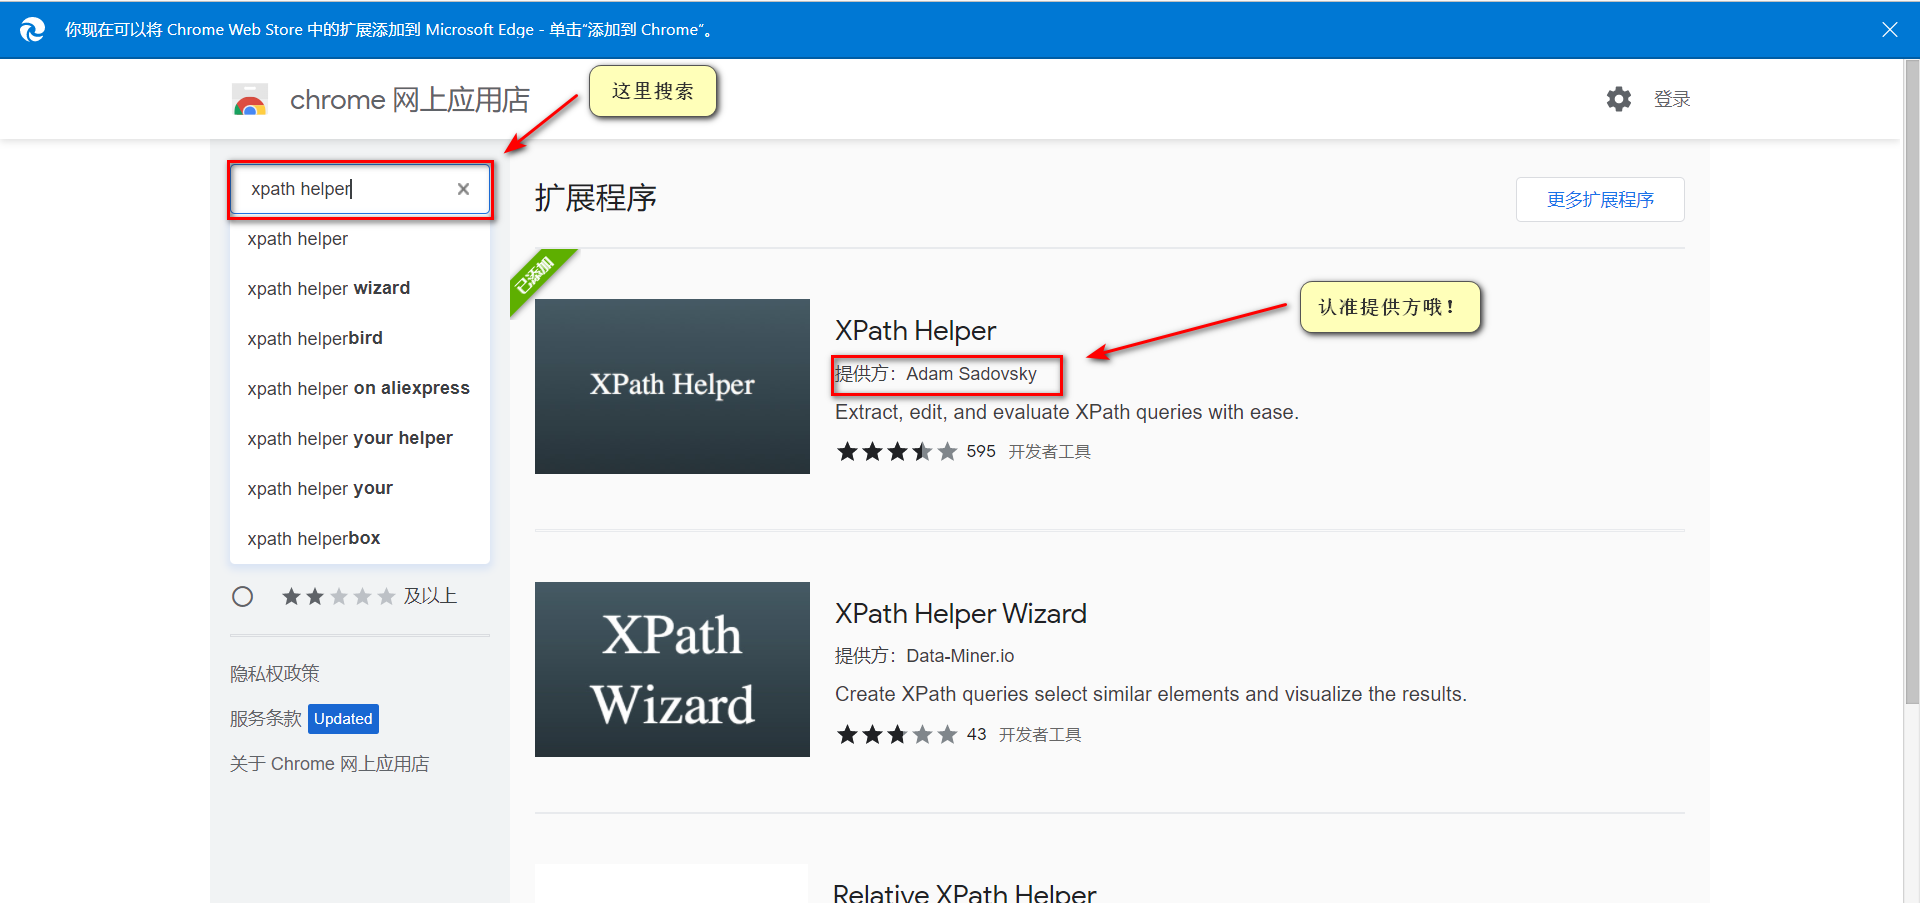
xpath helper的安装
以Edge浏览器作为示例。


xpath helper的使用
以滁州市天气情况为例
1
| url = http://tianqihoubao.com/weather/top/chuzhou.html
|
1
2
3
4
5
6
7
8
|
date = '//div[@id="content"]//tbody/tr/td[2]/b/a/text()'
date_url = '//div[@id="content"]//tbody/tr/td[2]/b/a/@href'
day_weather = '//div[@id="content"]//tbody/tr/td[3]/text()'
|
实战:爬取滁州市某月的天气情况
过去30天的数据
1
2
3
4
5
6
7
8
9
10
11
12
13
14
15
16
17
18
19
20
21
22
23
24
25
26
27
28
29
30
31
32
33
34
35
36
37
38
39
40
41
42
43
44
45
| import requests
from lxml import etree
import pandas as pd
city_url = 'http://tianqihoubao.com/weather/top/chuzhou.html'
respon = requests.get(city_url).text
content_text = etree.HTML(respon)
date_list = []
day_weather_list = []
day_wind_list = []
day_T_list = []
night_weather_list = []
night_wind_list = []
night_T_list = []
tr_list = content_text.xpath('//div[@id="content"]//table//tr')
for tr in tr_list[2:-1]:
date = tr.xpath('./td[2]/b/a/text()')[0]
day_weather = tr.xpath('./td[3]/text()')[0].strip()
day_wind = tr.xpath('./td[4]/text()')[0]
day_T = tr.xpath('./td[5]/text()')[0]
night_weather = tr.xpath('./td[6]/text()')[0].strip()
night_wind = tr.xpath('./td[7]/text()')[0].strip()
night_T = tr.xpath('./td[8]/text()')[0].strip()
date_list.append(date)
day_weather_list.append(day_weather)
day_wind_list.append(day_wind)
day_T_list.append(day_T)
night_weather_list.append(night_weather)
night_wind_list.append(night_wind)
night_T_list.append(night_T)
df = pd.DataFrame({
'日期': date_list,
'白天天气': day_weather_list,
'白天风力风向': day_wind_list,
'白天最高气温': day_T_list,
'夜间天气': night_weather_list,
'夜间风力风向': night_wind_list,
'夜间最高气温': night_T_list
})
df.to_excel('滁州市天气情况.xlsx', index=False)
|
指定城市的历史天气数据
1
2
3
4
5
6
7
8
9
10
11
12
13
14
15
16
17
18
19
20
21
22
23
24
25
26
27
28
29
30
31
32
33
34
35
36
37
38
39
40
41
42
43
44
45
46
47
48
49
50
51
52
53
54
55
56
57
58
59
60
61
62
63
64
65
66
67
68
69
70
71
72
73
74
75
76
77
78
79
80
81
82
83
84
85
86
87
88
89
90
91
92
93
94
95
96
97
98
99
100
101
102
103
104
105
106
107
108
109
110
111
112
113
114
115
116
117
118
119
120
121
122
| import requests
from lxml import etree
import pandas as pd
from xpinyin import Pinyin
name_city = '张家口'
P = Pinyin()
name_city_pinyin = P.get_pinyin(name_city, '')
header = {
'user-agent': 'Mozilla/5.0 (Windows NT 10.0; Win64; x64) AppleWebKit/537.36 (KHTML, like Gecko) Chrome/96.0.4664.45 Safari/537.36 Edg/96.0.1054.29'
}
urls_api = []
urls_month = []
for i in range(2014, 2022):
yue_list = ['01', '02', '03', '04', '05', '06', '07', '08', '09', '10', '11', '12']
for j in yue_list:
date_url = str(i)+str(j)
url_api = 'http://www.tianqihoubao.com/aqi/{0}-{1}.html'.format(name_city_pinyin, date_url)
url_month = 'http://www.tianqihoubao.com/lishi/{0}/month/{1}.html'.format(name_city_pinyin, date_url)
urls_api.append(url_api)
urls_month.append(url_month)
date_api_list = []
AQI_list = []
grade_list = []
PM25_list = []
PM10_list = []
SO2_list = []
NO2_list = []
CO_list = []
O3_list = []
date_month_list = []
weather_day_list = []
Tem_day_list = []
wind_day_list = []
weather_night_list = []
Tem_night_list = []
wind_night_list = []
for url_api in urls_api:
content_api = requests.get(url_api, headers=header).text
html_api = etree.HTML(content_api)
days_data = html_api.xpath('//div[@class="api_month_list"]//tr')
for day_data in days_data[1:-1]:
date = day_data.xpath('./td[1]/text()')[0].split()[0]
AQI = day_data.xpath('./td[2]/text()')[0].split()[0]
grade = day_data.xpath('./td[3]/text()')[0].split()[0]
PM25 = day_data.xpath('./td[5]/text()')[0]
PM10 = day_data.xpath('./td[6]/text()')[0]
SO2 = day_data.xpath('./td[7]/text()')[0]
NO2 = day_data.xpath('./td[8]/text()')[0]
CO = day_data.xpath('./td[9]/text()')[0]
O3 = day_data.xpath('./td[10]/text()')[0]
date_api_list.append(date)
AQI_list.append(AQI)
grade_list.append(grade)
PM25_list.append(PM25)
PM10_list.append(PM10)
SO2_list.append(SO2)
NO2_list.append(NO2)
CO_list.append(CO)
O3_list.append(O3)
for url_month in urls_month[1:-1]:
content_month = requests.get(url_month, headers=header).text
html_month = etree.HTML(content_month)
days_data_ = html_month.xpath('//div[@id="content"]//tr')
for day_data_ in days_data_[1:-1]:
date_month = day_data_.xpath('./td[1]/a/text()')[0].split()[0].replace('年', '-').replace('月', '-').replace('日', '')
weather_day = day_data_.xpath('./td[2]/text()')[0].split('/')[0].split()[0]
weather_night = day_data_.xpath('./td[2]/text()')[0].split('/')[1].split()[0]
Tem_day = day_data_.xpath('./td[3]/text()')[0].split('/')[0].split()[0]
Tem_night = day_data_.xpath('./td[3]/text()')[0].split('/')[1].split()[0]
wind_day = day_data_.xpath('./td[4]/text()')[0].split('/')[0].replace('\r', '').replace('\n', '').strip()
wind_night = day_data_.xpath('./td[4]/text()')[0].split('/')[1].replace('\r', '').replace('\n', '').strip()
date_month_list.append(date_month)
weather_day_list.append(weather_day)
weather_night_list.append(weather_night)
Tem_day_list.append(Tem_day)
Tem_night_list.append(Tem_night)
wind_day_list.append(wind_day)
wind_night_list.append(wind_night)
df1 = pd.DataFrame(
{
'空气质量日期': date_api_list,
'AQI': AQI_list,
'质量等级': grade_list,
'PM2.5': PM25_list,
'PM10': PM10_list,
'SO2': SO2_list,
'NO2': NO2_list,
'CO': CO_list,
'O3': O3_list,
}
)
df2 = pd.DataFrame(
{
'历史天气日期': date_month_list,
'白日天气情况': weather_day_list,
'夜晚天气情况': weather_night_list,
'白日气温': Tem_day_list,
'夜晚气温': Tem_night_list,
'白日风力风向': wind_day_list,
'夜晚风力风向': wind_night_list
}
)
df1['空气质量日期'] = pd.to_datetime(df1['空气质量日期'])
df2['历史天气日期'] = pd.to_datetime(df2['历史天气日期'])
df1_df2 = df1.merge(df2, left_on='空气质量日期', right_on='历史天气日期')
df1_df2 = df1_df2.drop('历史天气日期', axis=1)
df1.to_excel('{0}空气质量.xlsx'.format(name_city), index=False)
df2.to_excel('{0}历史天气.xlsx'.format(name_city), index=False)
df1_df2.to_excel('{0}数据合并.xlsx'.format(name_city), index=False)
|
保存数据
可以保存到本地文件,也可以保存到数据库(MySQL,Redis,Mongodb等)


